If you want a garden filled with beautiful tulips next spring, autumn is the time to start planning.
While most flowers are finishing their growing season, tulip bulbs are ready to go into the ground. October and November are among the best months to plant them in many temperate climates, giving the bulbs time to develop roots before winter.
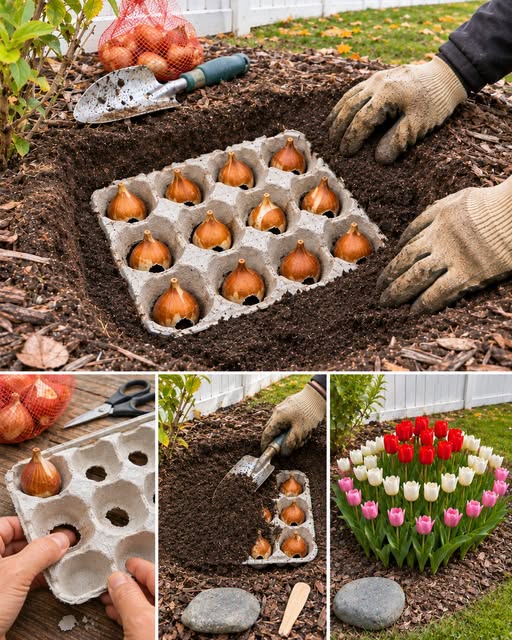
And there’s a simple gardening trick worth trying: using a cardboard egg carton to help arrange your tulip bulbs in neat, evenly spaced groups.
This inexpensive method can make planting easier, particularly when you’re creating small flower displays or planting several bulbs together.
However, there are a few important details to understand. Tulips need the correct planting depth, good drainage, and enough space to grow. An egg carton can help with positioning, but it should never prevent the bulbs from being planted properly.
Here’s how to plant tulip bulbs this autumn, including the egg carton method, the best planting depth, common mistakes, and a few useful tips for bigger, healthier spring blooms.
Why October Is a Great Time to Plant Tulip Bulbs
Tulips are spring-flowering bulbs that are normally planted in autumn.
Unlike summer flowers that grow quickly after planting, tulips need an extended period of cool temperatures to develop properly and prepare for spring flowering.
Planting in autumn allows the bulbs to establish roots while the soil is still workable.
As winter arrives, the bulbs remain underground, protected from the cold by the surrounding soil.
When temperatures rise in spring, their leaves begin to emerge, followed by colorful flowers.
When Should You Plant Tulips?
The ideal planting period depends on your climate.
In many temperate regions, tulip bulbs are planted from October through November, and sometimes into December if the ground remains workable.
A useful guideline is to plant when soil temperatures have cooled to approximately 40–50°F (4–10°C).
Planting too early in warm soil can increase the risk of disease and premature growth.
In warmer regions, tulip bulbs may need a period of artificial chilling before planting because natural winter temperatures aren’t consistently cold enough.
Important: October is an excellent planting month in many locations, but gardeners in areas with warm autumns may benefit from waiting until November or later.
Method 1: Plant Tulip Bulbs Using a Cardboard Egg Carton
One of the most interesting ways to organize tulip planting is to use an ordinary cardboard egg carton.
The individual compartments can help you arrange bulbs into a compact group before placing them in the ground.
This can be especially useful if you’re planting a small flower bed or creating a colorful cluster of tulips.
However, the egg carton is a planting aid, not a substitute for correct bulb spacing and depth.
What You’ll Need
- 6–12 healthy tulip bulbs
- One plain, uncoated cardboard egg carton
- A garden trowel or small shovel
- Loose, well-draining garden soil
- Compost, if needed to improve the soil
- Water
- Optional gardening gloves
Step 1: Choose the Right Egg Carton
Use a plain cardboard or molded paper-pulp egg carton.
Avoid plastic and foam cartons because they don’t decompose in the soil.
Also avoid heavily coated, glossy, or waxed cartons.
Remove the lid and any unnecessary cardboard flaps.
The remaining egg compartments will act as a temporary planting guide.
Step 2: Choose Healthy Tulip Bulbs
Select firm bulbs without soft spots, mold, or visible decay.
Larger, healthy bulbs generally have better flowering potential than undersized or damaged ones.
Each bulb should have a pointed end and a flatter base.
The pointed end is where the shoot emerges, while roots develop from the basal plate at the bottom.
Step 3: Arrange the Bulbs in the Carton
Place one tulip bulb into each compartment, with the pointed end facing upward.
This gives you an easy way to visualize your planting pattern.
Check the spacing before proceeding.
Standard egg cartons often place bulbs closer together than recommended for long-term growth.
If the compartments are too close, use every second compartment, cut the carton into separate sections, or use it only as a temporary positioning template.
For many standard tulips, approximately 4–6 inches (10–15 cm) between bulbs is a useful planting distance.
Closer planting can work for short-term displays, but crowded bulbs may compete for nutrients and moisture in later seasons.
Step 4: Prepare the Planting Hole
Choose a location that receives plenty of sunlight during the spring growing season.
Tulips generally perform best in well-draining soil.
Dig a broad planting hole large enough to accommodate the bulbs at the correct depth.
Most tulip bulbs should be planted approximately three times as deep as the bulb’s height, measured from the soil surface to the bottom of the bulb.
For many standard tulip bulbs, this means approximately 6–8 inches (15–20 cm) deep.
Follow the instructions supplied with your particular variety.
Step 5: Prepare the Carton for Planting
If you want to bury the carton with the bulbs, make generous openings in the bottoms of the compartments.
This allows roots to reach the soil more easily.
Plain paper-pulp cartons can eventually decompose, but the speed varies with soil conditions.
The carton should not create a barrier beneath the roots or hold excessive moisture around the bulbs.
A more reliable alternative is to use the carton as a positioning guide, then remove it and plant the bulbs directly in the soil.
This provides the same spacing benefit without introducing an extra material around the bulbs.
Step 6: Position the Bulbs at the Correct Depth
Place the bulbs in the prepared planting area with their pointed ends facing upward.
If you’re using the carton as a temporary guide, lift it away carefully after arranging the bulbs.
If you’re using a suitable paper-pulp carton in the ground, make sure the bulbs still sit at the correct depth and can root freely into the surrounding soil.
Step 7: Cover With Soil
Backfill the planting hole gently.
Avoid leaving large air pockets around the bulbs.
The soil should cover the bulbs to the recommended depth.
Don’t leave the tips exposed above the ground.
Step 8: Water After Planting
Water the planting area after covering the bulbs.
This helps settle the soil around them and encourages root development.
Afterward, additional watering is usually unnecessary unless autumn conditions are unusually dry.
Avoid keeping the soil constantly wet.
Step 9: Mark the Planting Location
Place a small garden marker or decorative stone near the planted area.
This will help you remember where the bulbs are located and prevent accidental digging during winter.
Step 10: Wait for Spring
Over the following weeks, the bulbs develop roots beneath the soil.
They remain largely hidden throughout winter.
As spring approaches and temperatures rise, green shoots begin to emerge.
Eventually, your planting area can become a beautiful cluster of tulips.
Does the Egg Carton Method Really Work?
Yes, a cardboard egg carton can be useful for arranging bulbs before planting.
However, there is no strong evidence that burying an egg carton makes tulips grow faster, produce larger flowers, or develop stronger roots.
Its main advantage is convenience and organization.
For the best results, use the carton as a spacing template and plant the bulbs directly into the soil.
This is particularly helpful if you want the convenience of the trick without risking restricted root growth or excess moisture.
Method 2: The Traditional Way to Plant Tulip Bulbs
The traditional planting method is simple, reliable, and suitable for almost every garden.
It’s also the best choice when you’re planting large numbers of bulbs or creating natural-looking flower beds.
Step 1: Choose a Sunny Location
Tulips prefer full sun during their active spring growing season.
Aim for a location that receives at least six hours of direct sunlight when possible.
Under deciduous trees, tulips may still perform well because they often grow and flower before the trees develop their full canopy.
Step 2: Prepare the Soil
Loosen the soil with a garden fork or shovel.
Tulips dislike waterlogged conditions, particularly during their dormant period.
If the soil is heavy clay, improve drainage through appropriate soil preparation or consider raised beds.
Adding finished compost can improve soil structure, but avoid excessive amounts of rich organic material directly around the bulbs.
Step 3: Dig the Planting Holes
Plant bulbs at a depth approximately three times their height.
For standard tulip bulbs, this is often around 6–8 inches (15–20 cm).
Smaller botanical tulips may need shallower planting.
Step 4: Space the Bulbs
For standard tulips, approximately 4–6 inches (10–15 cm) apart is a practical guideline.
You can plant them in groups rather than perfectly straight rows for a more natural appearance.
Step 5: Position Each Bulb
Place the pointed end upward.
If you can’t identify the top easily, examine the bulb for the flatter basal plate where roots emerge.
Step 6: Cover and Water
Replace the soil, firm it gently, and water after planting.
Don’t compact the soil excessively.
A Beautiful Planting Trick
Instead of planting tulips individually in straight lines, try planting them in groups of 7, 9, 15, or more bulbs.
Clusters often create a fuller, more impressive display than widely scattered single flowers.
Method 3: Plant Tulip Bulbs in Pots and Containers
You don’t need a large garden to enjoy tulips.
They grow beautifully in pots, making them perfect for balconies, patios, doorsteps, and small outdoor spaces.
What You’ll Need
- A deep container with drainage holes
- Quality potting mix
- Healthy tulip bulbs
- Optional grit or perlite for drainage
- Water
Step 1: Choose a Suitable Container
Select a pot deep enough to accommodate the bulbs, their roots, and the necessary soil covering.
For many standard tulips, a container approximately 12 inches (30 cm) deep or deeper works well.
Make sure it has drainage holes.
Step 2: Add Potting Mix
Fill the lower part of the container with well-draining potting mix.
Don’t place a thick layer of stones at the bottom as a substitute for drainage holes.
Proper drainage depends primarily on the container and growing medium.
Step 3: Arrange the Bulbs
Position the bulbs with their pointed ends upward.
For a seasonal container display, tulips can be planted somewhat closer together than in permanent garden beds, provided they aren’t touching.
Leave enough space for roots to develop.
Step 4: Cover the Bulbs
Add enough potting mix to cover the bulbs at the appropriate depth.
Leave a little space below the rim to make watering easier.
Step 5: Water
Water thoroughly after planting and allow excess water to drain away.
Step 6: Keep the Container Cool
Tulip bulbs need a prolonged period of cool temperatures.
In cold climates, containers may require protection from repeated severe freezing because their roots are more exposed than bulbs planted in the ground.
An unheated, frost-protected location can work in some situations, provided the bulbs receive sufficient chilling.
In mild climates, bulbs may need pre-chilling.
Step 7: Move Into a Bright Position as Growth Begins
When shoots emerge in spring, make sure the plants receive adequate light.
Water as needed, without allowing the container to become waterlogged.
How Deep Should You Plant Tulip Bulbs?
Planting depth is one of the most important factors in successful tulip growing.
A useful general rule is to plant bulbs at a depth around three times their height.
| Bulb Size | Approximate Planting Depth |
|---|---|
| Small botanical tulips | 4–5 inches (10–13 cm) |
| Medium tulip bulbs | 5–6 inches (13–15 cm) |
| Large standard tulips | 6–8 inches (15–20 cm) |
These are general guidelines. Follow variety-specific recommendations when available.
Planting too shallowly may expose bulbs to temperature fluctuations and disturbance by animals.
Planting excessively deeply can make emergence more difficult, especially in heavy soil.
7 Important Tips for Bigger, Healthier Tulips Next Spring
1. Choose Firm, Healthy Bulbs
Avoid bulbs that feel soft, moldy, or damaged.
Healthy bulbs are the foundation of a good spring display.
2. Don’t Plant Too Early
Wait until the soil has cooled.
Planting in warm autumn soil can increase the risk of fungal diseases.
3. Make Drainage a Priority
Tulips need moisture to establish roots, but they don’t tolerate prolonged waterlogging.
Choose a well-draining location.
4. Plant in Groups for More Impact
Clusters of tulips often create a more attractive display than single bulbs planted far apart.
Try combining several bulbs of the same variety.
5. Protect Bulbs From Rodents
Squirrels, mice, and other animals may dig up or eat tulip bulbs.
Where this is a problem, consider using suitable metal mesh bulb cages.
Avoid sharp, exposed wire edges.
6. Avoid Excessive Fertilizer
Tulip bulbs already contain stored energy for their first flowering season.
A soil test can help determine whether additional nutrients are needed.
Avoid placing concentrated fertilizer directly against bulbs.
7. Let the Leaves Die Back Naturally
After flowering, don’t cut off the green leaves immediately.
They continue photosynthesizing and help replenish the bulb’s energy reserves.
Allow foliage to yellow naturally before removing it.
What Happens to Tulip Bulbs After You Plant Them?
Tulip bulbs go through several stages before producing their spring flowers.
Autumn: Root Development
Once planted in suitable conditions, the bulbs begin developing roots.
The flower structure is already largely formed inside a healthy mature bulb.
Winter: Chilling Period
Tulips require an extended period of cold temperatures for normal spring development.
The exact chilling requirement depends on the cultivar.
Early Spring: Leaf Emergence
As soil temperatures rise, shoots begin pushing upward through the soil.
Spring: Flowering
Tulips produce their characteristic flowers, with timing depending on the variety and local climate.
Early tulips may bloom in March, while later varieties can continue flowering into May in many temperate regions.
After Flowering: Energy Storage
Leaves continue collecting energy until they naturally yellow and die back.
In suitable conditions, this helps the bulb prepare for future growth.
However, many modern tulip varieties don’t return as strongly in subsequent years, especially in climates with wet summers.
Some gardeners therefore treat them as annual displays and plant fresh bulbs each autumn.
6 Common Mistakes to Avoid When Planting Tulips
Mistake 1: Planting Bulbs Upside Down
The pointed end should generally face upward.
Mistake 2: Using Poorly Drained Soil
Wet soil can encourage bulb rot.
Mistake 3: Planting Too Early
Warm soil can increase the risk of disease.
Mistake 4: Planting Too Shallowly
Shallow bulbs may be more vulnerable to disturbance and temperature changes.
Mistake 5: Burying Bulbs in Plastic Egg Cartons
Plastic and foam egg cartons don’t decompose and can interfere with root growth.
Use only appropriate paper-pulp materials, and preferably use the carton as a temporary spacing guide.
Mistake 6: Cutting Off Green Leaves After Flowering
Removing healthy leaves too early reduces the plant’s ability to replenish its stored energy.
Frequently Asked Questions
Is October a good month to plant tulip bulbs?
Yes. October is an excellent month in many temperate climates, especially once soil temperatures have cooled sufficiently.
Can you plant tulip bulbs in November?
Yes. November is often ideal, particularly in regions with relatively mild autumns.
Can you plant tulip bulbs in December?
In many climates, yes, provided the ground isn’t frozen or waterlogged and the bulbs can receive enough chilling.
Can you really plant tulips using an egg carton?
Yes, a cardboard egg carton can help organize bulbs. However, it is best used as a positioning guide rather than a permanent planting container.
Will an egg carton decompose in the soil?
Plain, uncoated paper-pulp cartons can decompose, but the rate depends on moisture, temperature, and soil conditions.
Does the egg carton make tulips grow faster?
There is no reliable evidence that it accelerates growth or improves flowering.
Its main benefit is helping gardeners arrange bulbs.
How many tulip bulbs should I plant together?
Groups of 7–15 bulbs or more can create attractive displays, depending on the available space and variety.
How deep should tulip bulbs be planted?
Generally around three times the height of the bulb, often approximately 6–8 inches (15–20 cm) for standard tulips.
Do tulips need sunlight?
Yes. Most tulips flower best in full sun during spring.
Should you soak tulip bulbs before planting?
No. Soaking is generally unnecessary and may encourage decay if bulbs remain wet for too long.
Do tulips come back every year?
Some tulips return and flower for several years, especially botanical and certain perennializing varieties.
Many modern hybrid tulips are less reliable as long-term perennials.
Can tulips grow in containers?
Yes. They grow well in deep containers with suitable drainage and adequate winter chilling.
What should I do if squirrels dig up my bulbs?
Consider planting in protective wire-mesh cages or using other physical barriers.
Are tulip bulbs poisonous to pets?
Yes. Tulips contain compounds that can be toxic to cats and dogs, particularly in the bulbs. Keep stored and planted bulbs away from pets that may dig them up or chew them.
Final Thoughts
If you want a beautiful display of tulips next spring, autumn is the season to begin.
Planting tulip bulbs in October or November gives them the cool conditions and time they need to establish roots before winter.
Whether you’re creating a colorful flower bed, planting a collection of pots, or experimenting with the cardboard egg carton trick, the essentials remain the same.
Choose healthy bulbs, plant them at the correct depth, provide good drainage, and give them enough space to develop.
The egg carton method can be a fun and inexpensive way to plan your planting layout, especially for beginners. Just remember that the carton itself doesn’t improve bulb growth, and planting directly into the soil is generally the most reliable approach.
A little work in autumn can reward you with weeks of spectacular color when spring arrives.
So before the planting season passes, gather your tulip bulbs, choose a sunny spot, and start preparing your garden.
The beautiful tulips you want to see next spring begin with the bulbs you plant this autumn!

